Mist Net Kit Installation Instructions |
|
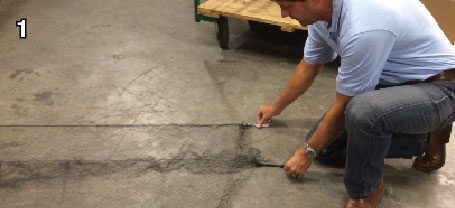
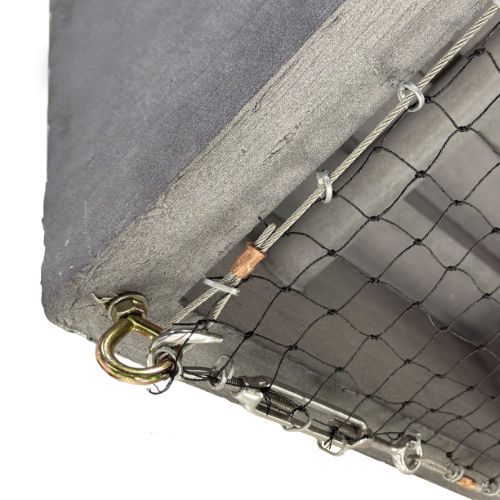
Step 1BEST PERFORMED WITH TWO PERSONS Open the mist net package and lay the net flat on floor. With the net laying flat, carefully lift each support line and lift the net slightly over the panel above it to form pockets that will be used to capture birds. |
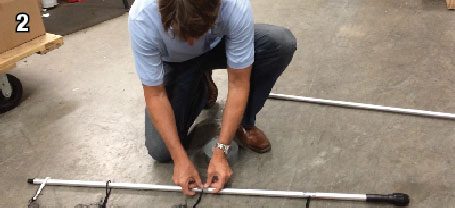
Step 2With the net in place, thread the 55” net pole through the loops on each end of the net. Be careful not to move the support lines too far out of place. Space the loops evenly along the length of the pole. With the loops in place, carefully secure them to the net pole with duct tape. |
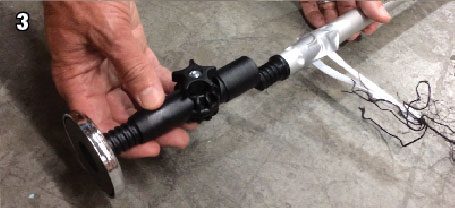
Step 3Attach the appropriate head (magnet or hook) to the end of each net pole top by screwing them onto the threaded tip. |
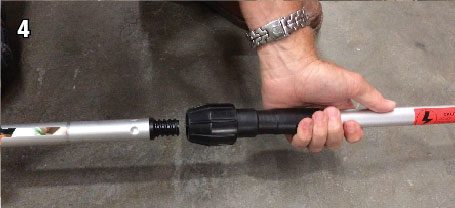
Step 4Insert the threaded tip of each extension pole into the collared receiver at the bottom of the net pole. Twist the extension pole to screw it onto the net pole. Tighten the collar to lock the parts firmly in place. Make sure the collar is unscrewed all the way before screwing the pole into it. |

Step 5With one person on each end, carefully lift the extension poles and walk the net assembly to the target area. Once in the correct area, lift the extension pole and attach the tip to a rafter or other structure. Or use the hooks provided in the kit if the magnetic adapter is not appropriate. FOR SAFETY: DO NOT LEAVE THE HANGING NET ASSEMBLY UNATTENDED. Use the fibreglass chase pole and pen laser to chase the target birds towards the mist net. Once a bird has been captured, the net must be taken down immediately and the bird removed while it is still alive. Remove the bird and transfer it to a holding cage for safe release later. |
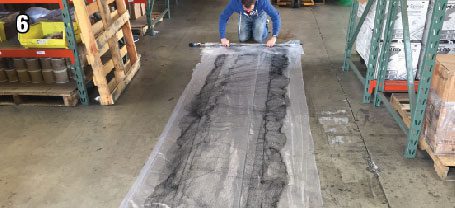
Step 6To remove the net, each operator should detach it from the structure and walk the assembly back to the staging area for disassembly. Loosen the collar at the bottom of each short net pole and unscrew them from the extension poles. Carefully lay the mist net flat on the included plastic sheet, making sure the net lays entirely on the sheet, then roll the net and sheet together around one of the poles. |
| Download these Installation Instructions (PDF) | |
- Shop by Product
-
- Supporting Products
- Shop by Bird
- Shop by Structure
- Shop by Product
-
-
-
Our Entire Bird Control Product Line
-
-
-
Our Supporting Products
-
-
-
-
-
Edge-to-Edge, Corner-to-Corner Defense Devices
- StealthNet® Bird Netting
- Solar Panel Protection
- Dryer Vent Guard
-
Stop Birds On Roofs, Courtyards & Agriculture
- Gridwire™
- Daddi Long Legs™
- Eagle Eye®
- Bird Skip
- Visual Deterrents
- Sound Deterrents
- Smell & Taste Deterrents
- Wildlife Traps
-
Stop Large Flocks of Birds with Birth Control
- OvoControl®
-
-
-
Protect Ledges, Pipes, Edges & Similar
- Bird-Shock® Flex-Track
- Optical Gel™
- Bird-Flite® Spikes
- Dura-Spike®
- BirdSlide™
- Birdwire®
- TowerGuard
- Gutter-Point™
- Tree Shock™
- Bird-Coil®
- Dock Defense
-
Traps & Nets for Indoor/Out Bird Capture & Relocation
- Mist Nets
- Bird Traps
- Batcone®
-
-
-
Tools & Training Equipment for Our Products
- Hardware & Adhesives
- Cleaning Supplies
- Poles
- Training
-
Unique Pest Control
- Border Control™
-
-
-
-
- Shop by Bird
-
-
- All About Bird Damage
-
How birds cause and photos of example we’ve caught to show you & then products we’d use to fix each one.
- Info On Birds & Disease
-
Do birds have diseases and can they give a disease to me?
-
-
.
-
-
- Shop by Structure
-
-
-
Types of Buildings
-
-
-
Structural Hot Spots
-
-
-
-
- About
-
-
About Bird Barrier
- Company History & How We're Here for You
-
Top News
- Optical Gel White Paper · A View of Modern Bird Control
-
Contact Us
- Tap to Call Us - 310 527 8000Or Call Us at 800-NO-BIRDS
- Email Us
Headquarters
20925 Chico Street
Carson, CA 90746 USA- Google Maps Location
- Our Team
- Blog
-
-
Subscribe to Our Newsletter
-
-
-
- Cart0
- For Installers
-
-
- Bird Control Training
- Join Us For Live Training Classes
-
Installer Tools
- Product Advisor
- Quickly pick products based on three questions
- Quick Quote
- Get a professional quote done fast
- Material Estimator
- Figure out how much a project will cost
-
Sales Information
- Selling Bird Control
- Bid Barrier Catalog
- Download a PDF of our catalog
-
Installation Help
- Technical Documents
- Safety Data Sheets
- Installation Videos
- Bird Barrier on YouTube
-
-
- Installers
-
-
-
ProL@bb Training
-
-
-
ProL@bb Technicians · Your Install, Sales & Bidding Tools Below
-
-
-
-
- Product Advisor
- Quickly pick products for a job & refine them later, or as a buyer/DIY installer, find what to buy through our experience.
Sales Information
- Get Our Real Catalog
- Selling Bird Control
-
- Quick Quote
- An installer's tool that gets a professional quote done fast, emailed to a client & saved for similar future quotes.
Installation Instructions
- Product Instruction Sheets
- SDS (Safety Data Sheets)
-
- Material Estimator
- Get quotes finished fast & with very accurate total amounts served from our vast experience in similarly needed quantities.
Installation Videos
- Product How-To Videos
- Bird Barrier on YouTube
-
- Login/Reg
-
-
-
Access Your Account
- Login/Register Account
- Forgot Your Password?
-
-
-
Your Account Details
-
-
-
- Login/Reg
- Cart0
-
-
Cart
-
-
-
- Contact
- 310-527-8000