StealthNet Installation Instructions
StealthNet installation can be very complicated if you don’t think it through properly in the beginning. However, with good planning, it is a very easy proposition.
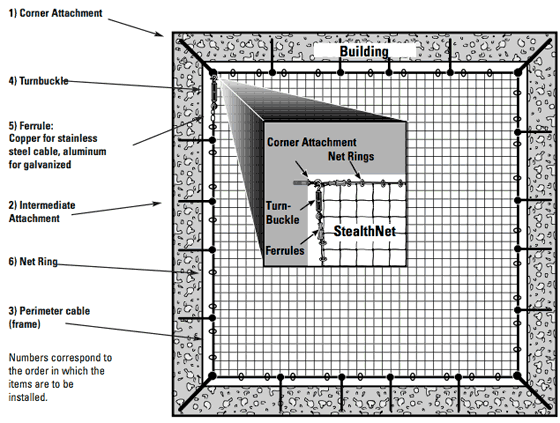
There are seven elements in every job. If you pick the correct piece of hardware for each of the seven elements, you will be able to install a professional, effective and long-lasting netting application every time. The basic configuration of every net job is a strong, tensioned cable which borders an opening to which bird netting is later attached. The cable is attached to the building using a variety of hardware attachments, and the bird netting is attached to the cable using net rings.
Following is a rundown of the seven basic elements in a net job:
1) Corner Attachments
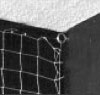
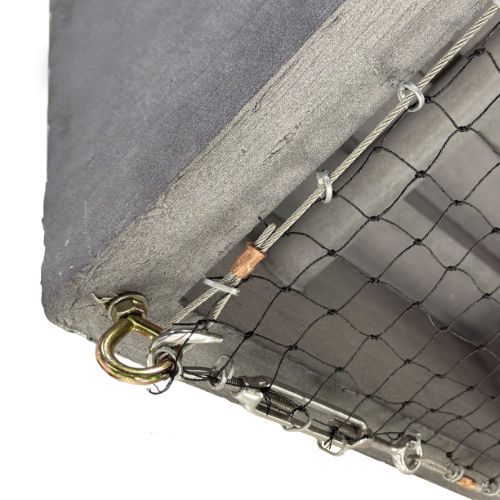
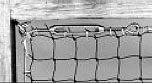
Corner attachments are the most important part of installation. They are used where cables turn cor- ners or where cables end. They with- stand a great deal of pressure.
There are two important consider- ations regarding corner attachments—where you install them and which ones you choose.
The location of corner attachments is usually quite sim-ple to determine. It is where natural corners fall in the shape of the net or where cables end at a wall. When bird netting off a square opening on the side of a building, the corner attachments are placed in each corner (four). When a three dimensional job is installed, corner attachments may be placed on opposite walls with a cable running between them. This cable forces the net to take a corner.
The choice of which attachment to use is determined by the substrate material surrounding your job. If you are working with concrete, you need to install netbolts that expand when you tighten them (see corner attachment page in the catalog). Likewise, if you are working with wood, you need to use corner attachments which fasten into wood. These anchors must be strong because great tension will be applied by the system, and the corners will take most of the strain.
2) Intermediate Attachments
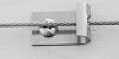
Like the corner attachments, the intermediates also hold the cable to the structure. In this case, however, the job of these fasteners is to hold the cable tight against the wall along the side of the net job, so the cable will not bow away and allow birds to enter the bird-free zone. If the cable were attached in just the corners, the tension of the bird netting would pull the cable away from the walls. The inter- mediate attachments, when placed every few feet along the run of the cable, prevent this from happening. For pigeons and larger birds it is acceptable to install them every three to four feet. For smaller birds, like sparrows and swallows, the attachments must be much closer together (no more than two feet), so small birds cannot get behind the cable gaps. All of Bird Barrier’s intermediate attachments are designed to be strong yet discreet.
Different intermediate attachments are available for different substrate materials. Attachments are available for stone, steel, wood, sheet metal and stucco. Hardware is available in galvanized or stainless steel versions. Please refer to the Intermediate Attachments section (pages 12-13) of Bird Barrier’s product catalog.
3) Perimeter Cable
As previously stated, the cable frames the entire net project and forces the net to take corners on three dimension- al jobs. Bird Barrier’s cable is available in galvanized and stainless steel. The cable is designed to be exceptionally strong, yet very hard to see. The cable may be used under large panels of bird netting on outdoor, horizontal applications (like over a courtyard), and is especially critical if snow or ice could build up on the bird netting. The cable is looped at one end through the corner attachment, runs through every intermediate attachment, and is looped at the other end through the turnbuckle (see below).
4) Intermediate Attachments
The cable is tensioned between corner attach- ments and through intermediate attachments with turn buckles. These small screw-tensioning devices can exert thousands of pounds of ten- sion on the cable, so it must be strong and the corners must be anchored securely.
There are three different turnbuckle sizes all of which are available in galvanized and stainless steel. Small turn- buckles are for cable runs under 25 feet. Medium turnbuckles are used for cable runs between 25 and 75 feet, and large turnbuckles are for cable runs above 75 feet. It is important that the turnbuckle is opened all the way and that the cable is pulled as tight as possible before the loop is crimped to take up as much slack and stretch in the cable as possible. For installations under 10 feet in length, the tensioned cable should not be allowed to run through more than one corner attachment. For installations over 10 feet, turnbuckles must be used for every straight run.
5) Ferrules and Ratchet Crimper
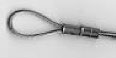
Ferrules are used to secure loops in the cable at each end (at corner attachments). One loop is fastened to a corner attachment; the other loop to an opened turnbuckle. The ferrules are slid onto the cable before the loop is formed and then crushed around the cable with Bird Barrier’s powerful ratchet crimper. When using the ratchet crimper place the ferrule into the middle or end slot with the narrow part facing up and then crimp down once on each end of the ferrule crushing both ends completely (you must crimp each ferrule twice for a strong hold). Always use 2 ferrules per loop for added strength and reliability of the perimeter cable system.This creates a strong, yet discreet, loop.
6) Net Ring Loops
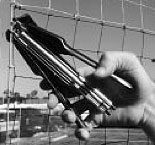
The bird netting is fastened to the cable using a special Net Ring tool. This tool loops a small piece of metal around the bird netting and the cable. It is easy to use, carries a cartridge of 50 rings, and is the fastest and strongest way of attaching the net to the cable. Use one loop per square of bird netting. To estimate the amount of Net Rings for the job, multiply the number of net rings per foot by the total feet of cable being used. For example:
2″ Net = 6 Net Rings per foot. 3/4″ Net = 16 Net Rings per foot, or 8 if you skip every other square.
Net rings come packaged 2,500 to a box.
7) Selection and Attachment of the Bird Netting
Now that the cable frame is in place, it is time to install the net that best matches your building’s color and bird control objectives. The color net you chose should reflect the dom- inant color of the building. StealthNet is available in 4 dif- ferent colors: black, stone (beige) and whitel. The most commonly used color, and often the most commonly used often the least visible, is black StealthNet. Stone bird netting is against beige, brown, and other sandstone buildings. White StealthNet works best against white buildings that are not exposed to direct sun reflection or bright lights. This is due to the light reflection properties of white colors. Black should be used if bright light, like sunlight, will shine directly on it.
StealthNet is designed in three standard mesh sizes (size of each square) depending upon the species to be excluded. They are as follows:
3/4″ – Sparrows, swallows, small birds and all large bird species
1-1/8″ – Starlings, black birds and all larger bird species
2″ – Pigeons and all large bird species
4″ – Gulls and other large sea-birds
Custom-designed mesh sizes can be created for unique species (special order product; 8-10 weeks). StealthNet is available in a variety of standard sizes and can often be cus- tom fitted to meet your projects needs. See Bird Barrier’s product catalog or call Bird Barrier for sizes and availability.
8) Access to the Netted Area
Once the net is in place, access to the area may be gained with the use of either zippers or net clips. To install zippers or net clips simply set them on top of the installed net where access is desired. Attach the zipper by net ringing through the cloth of the zip- per while grabbing the net strand as well. Net ring up both sides of the zipper to hold it firmly in place. Finish by unzipping and cutting out the middle net strands. When using net clips, slip the clips onto each side of the mesh opening and cut out the net strands between that the clips will replace.
Un-Bundling Your Net
When you receive the net, you will notice that identification tags mark each corner of the net and in the case of rectan- gular shaped nets, a special tag is used to identify the long side of the net. To unfold the net, locate the strings that are used to mark the corners and pull the net out flat. The net will appear to be diamond shaped before being fully stretched out. Call Bird Barrier if you have any questions about our products.
When attaching StealthNet, begin working from one corner and attach the net with net rings in a straight, even row in one direction. After you have a few feet attached, go back to the same corner and attach a foot or two in the opposite direction so that the net is firmly attached in that corner. Finish net ringing one of the rows entirely, preferably the length (longest) side if it is a rectangular net. Once you have finished the row, go back to the beginning corner and go down in the perpendicular direction. Now that you have the top and one side finished, you can either do the bottom or the other end. When the bird netting is completely secured to the cable, check your cable. If the cable is bowing away from the building with a gap larger than the mesh size of the bird netting, tighten the turnbuckle (this will tighten the cable and close the gap)
ALL NETTING ATTACHMENT MUST BE DONE IN ONE DIRECTION ONLY! NEVER attempt to work from opposite ends and meet in the middle!
Netting is a complicated installation and Bird Barrier recommends new installers attend our two day training course and review our installation videos to help lessen the chance of costly errors.
Additional Installation Assistance
While actual net installations are often very easy, some jobs can be very complicated, time-consuming affairs. The best installers have many successful jobs under their belts and learned most of their lessons on the job. Obviously a few pages of text and pictures in a manual cannot hope to make you a professional net installer, but Bird Barrier’s How-To Netting video just might do a better job. Please call our offices at 800-503-5444 to order your copy.
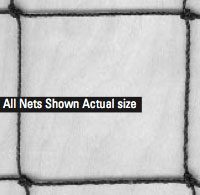
2-inch Mesh
Target Birds: Pigeons and larger
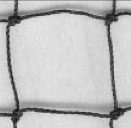
1-1/8 inch Mesh
Target Birds: Starlings, grackles, blackbirds, pigeons, gulls and all larger species
3/4-inch H.D. & Standard Mesh
Target Birds: Sparrows, swallows and all pest birds.
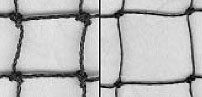
Note: Use Standard grade bird netting for jobs 25′ x 25′ or less, or long narrow panels up to 20′ wide. Use H.D. for all other 3/4″ jobs.