Birdwire Installation Instructions
Birdwire is one of the most discreet ledge products available. It effectively protects light to medium pressure exposed ledges from pigeons and larger birds. It does not work on recessed ledges or in nesting or roosting areas unless it is electrified (BirdFence). Because it blends so well with architecture, it is the only approved product for the federal government’s historical buildings and other installations where visibility is important, like upscale museums or hotels. It can also be used to deter soaring birds from large open areas when installed in a grid pattern (Gridwire – call for more details).
A Birdwire installation consists of two key elements:
- Stainless steel posts attached to a ledge or mounting surface
- Thin stainless steel wire spring-tensioned between the posts
Birdwire Post Spacing
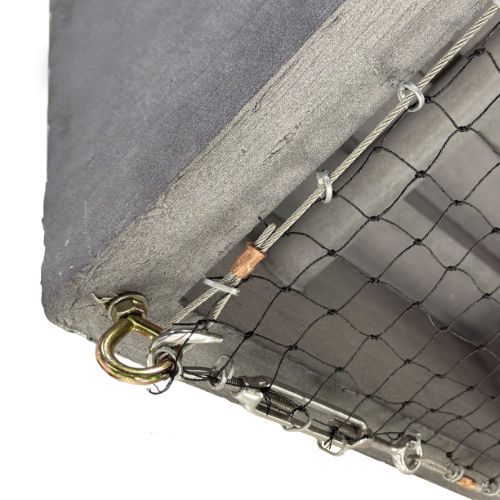
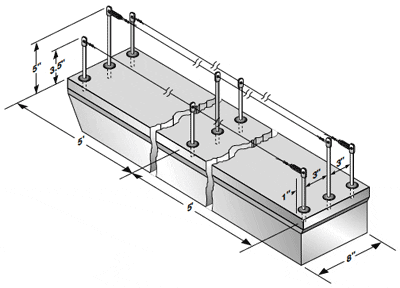
As the diagram indicates, the first row of posts (on the outer edge of the ledge) should be no more than 1″ from the edge. The posts behind the first post should be no more than 3″ apart. The gap behind the last post and the back wall can be no more than 3″. Posts are mounted no more than five feet down the length of the ledge. The wire is installed in ten foot sections. A spring is installed at one end, while both ends are made into a loop with small Birdwire crimps.
As shown by the diagrams, the wires are mounted above the ledge in alternating heights: 3.5″ and 5″. A variety of installation options are available for different substrate materials. A space of three inches is left between the posts from front to back, and a five foot space is left between posts along the length of the ledge. Springs are installed (and the wire is terminated) every ten feet.
Best Method for Birdwire Installation
Anchoring Your Posts by Drilling Holes – Concrete, Stone or Wood
Work in ten foot sections.
- Drill three 6.5mm holes one inch deep using a hammer drill (see post placement in the diagram on this page).
- Insert nylon anchor rivets into the holes.
- Use posts that are 4.5″ and 6″ long because you will hammer them in one inch, leaving you with your wires 3.5″ and 5″ above the ledge. Hammer the posts into the holes one inch. Face the loop of the center post in the correct direction for the wire to pass through it, and place the end posts 90 degrees to that angle, so the wire loops can terminate in the posts.
Secondary Method of Birdwire Installation
Anchoring Your Posts without Drilling Holes – Using Stick-on-Bases Work in ten foot sections.
- Use Bird Barrier’s glue-on bases (see catalog). These can be glued to most surface, or screwed in place.
- Use posts that are 3.5″ and 5″ long because you will not be hammering the posts into the ledge one inch. Insert the posts into the bases and tighten the set screw.
Important Note About Using Glue: It is critical that you test a few bases before gluing them all down. Many glues may not hold to your surface. If using Bird Barrier Bond, apply a marble-sized dab to the base, press down to the ledge, then pull the base up off the ledge for about two minutes, then re-press in place. This starts the evaporation process that is critical for the glue to dry. If you need extra-fast drying, use Bird Barrier Super Bond (see the catalog).
Bird Barrier Bond Usage
10.2 oz cartridge = 125 bases, 3.75 oz tube = 50 bases
Attaching the Birdwire to the Posts
- Attach the wire to one end post first. To do this, thread the wire through a Birdwire Crimp, through the loop in the post, and back through the crimp. Slide the crimp into the slot in the crimping tool and squeeze very hard. Trim the excess wire with the crimping tool.
- Thread the wire through the center post.
- Attach a spring to the post at the other end of the ten foot section.
- Attach the wire to the spring using the same Crimp technique described in #1. Be sure to pull the wire tight before crimping the wire in place.
Installation Time for Birdwire
About 35 minutes for 25′ (two rows).