Bird-Shock Flex-Track Installation Instructions
Please read these instructions thoroughly before attempting to install your Bird-Shock Flex-Track system.
Bird Barrier’s Bird-Shock Flex Track is a relatively simple product to install. You will benefit from some electrical knowledge, and the ability to adapt things to certain circumstances. While the system has been well thought out, there may be situations where you need to improvise. Our Customer Service department can help you if you have problems, or need additional assistance. They can be reached at (800) 503-5444, 7am to 5pm Pacific Time.
Required Tools
- Cut & Strip Tool for Lead Wire
- Connector Crimp Tool
- Track Cutter Tool or Strong Scissors
- Bird Barrier Bond and caulking gun
- Utility knife or pocket knife
- Tape measure
- Pen or pencil
Step 1 – Choose the ideal position for the Bird-Shock Charger Unit
Whenever possible, position the Charger Unit as near the track system as possible. Solar Chargers need to face due South to capture as much sunlight as possible (or North in the Southern hemisphere). Plug-in Chargers (110v.) need to be installed out of the weather. Use a NEMA 3R rated box to protect the 110v unit when exterior placement is required. When installing the 110v unit, make sure it is plugged into an outlet that has been installed by a licensed electrician. It is not necessary to install the charger unit close to the track; it is just more convenient that way. The length of wire run is added to the length of track, so a charger rated for 500 feet can run 450 feet of track and 50 feet of lead wire. The charger is connected to the track using either the straight connectors or crimp on connectors as shown later in these instructions.
Step 2 – Clean the intended Bird-Shock Flex-Track surface
The track requires a clean surface for the bond to adhere. Use Dissolve-it to break down droppings for easy cleanup. If possible, it is best to pressure wash the surface area. If applying to a painted surface, test a small area to be certain that the installation will not pull up the paint.
Step 3 – Plan the Bird-Shock Flex-Track positioning
The Track is delivered in 50 foot rolls. On straight open parapets where the installers can walk next to the installation surface, the track can be unrolled where it is to be positioned. In cases where the track is to be used in shorter lengths, they can be cut and positioned appropriately (cut them a few inches longer then trim in final installation. In other cases, like when working on a ladder or lift, the track may need to be unrolled little-by-little as the installer progresses down the building.
Step 4 – Glue Flex-Track to the surface
Use Bird Barrier Bond in 10 oz. tubes (fits into a caulking gun). The Bond can either be applied to the bottom of the track, or to the building surface. Run a bead of Bond about 1/4-inch in diameter in a straight line down the center of the track. When the track is pressed down the Bond will spread out near the edges of the track; this will ensure a long-term application.
Step 5 – Leave gaps for drainage if necessary
If there is a chance of puddles building up on one side of the track leave gaps in the Bond every 12 inches to allow for water seepage. To raise the track up slightly use the adhesive foam squares that are supplied with every case of track. Leave a half inch gap on either side of the foam pad.
Step 6 – Connecting the Tracks Together with Quick Connectors
If you choose not to buy these connectors, you can connect the tracks together with the male/female crimp connectors that come with the track. See later in these instructions for that method.

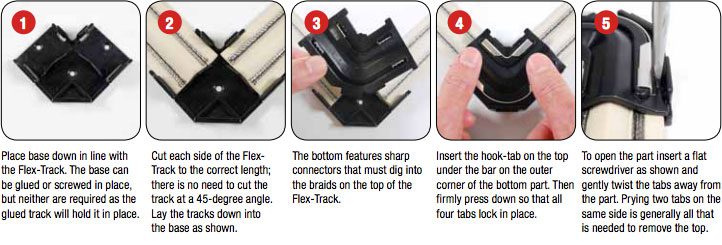
Step 7 – Making Corners with Quick Corner Connectors
If you choose not to buy these connectors, you can connect the tracks together with the male/female crimp connectors that come with the track. See later in these instructions for that method.
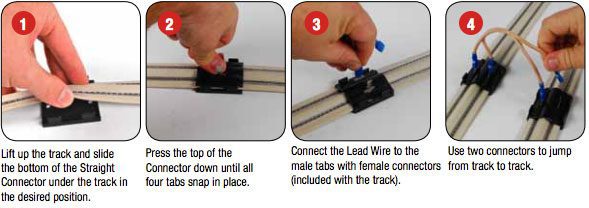
Step 8 – Attaching Lead Wires to the Flex-Track with the Straight Connector (above)
Insert the Straight Connector at any point where an electrical connection is desired. This can be for connecting to the power charger, or jumping from track to track.
Using Standard (included) Connectors to Connect Tracks and make Corners Straight Connectors

(1) Use a knife or sharp blade to cut the threads under the braid. Cut back under the braid about 1/2 inch. On one side of the track, trim off about 1/4” of the exposed braid to allow room for the connectors. Twist the braid into a wire like form. Stand the braid up straight from the track to allow easy installation of the connector. (2) Slide on the appropriate Male or Female connector for this splice. (3) Crimp across the barrel as shown, inline with connector. (4) Slide the male and female together and press firmly. When performing the crimp always use a Ratchet Crimp Tool to insure a complete and tight crimp. (Bird Barrier product warranty does not cover crimps). Install and crimp the second connector.
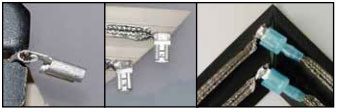
Corners Connections Flex Track can make gentle side to side curves to conform to building features, but it will need to be cut to handle abrupt corners. Corner Connectors are supplied with each roll of Flex Track and additional connector packs are available for complex jobs. A Flag Connector is used to make a tight turn in the braid for corners.
Use the very tip of the ratchet Crimp Tool to crimp the Flag Connector. This will insure a tight connection to the braid. This connection can be tricky so we suggest that you “Tug” on the end to insure that the Flag connector is secure. See photos below.
Connections Supplied with each 50’ Spool
- Connection from Track to Charger Unit (1 Set)
- Straight Connections (4 Sets)
- Corner Connections (4 Sets)
Additional connection kits available separately
- Straight Connection Kit (50 Sets)
- Corner Connections Kit (50 Sets)
- “T” Junction Kit (25 Sets)
The “T” Junction Kit has special connectors that support the ability to splice into an existing track and run in a different direction. Kit contains installation instructions.
Step 9 – Attaching Track to the Charger Unit
The Track and the Charger unit are connected using our copper dual lead wire. This special highly insulated wire is available separately in several in colors to match your needs, and in 50’ and 250’ rolls. To connect the wire, simply strip the ends of the dual leads and connect the Ring connector to one end and the appropriate male or female connector to attach the wire to the Flex Track.
Step 10 – Secure warning signs where appropriate
These warning signs (sold separately in packs of 10) should be glued anywhere that a person may come in contact with the track.
![]() Installation instructions for Bird-Shock on Signs
Installation instructions for Bird-Shock on Signs
![]() Installation instructions for Bird-Shock on Quick Connectors
Installation instructions for Bird-Shock on Quick Connectors