Bird-Coil Installation Instructions
Bird-Coil is one of the most affordable and easy to install ledge products available. Bird Coil is designed to deter pigeons and larger birds from landing, working best on light-to-medium pressure exposed ledges, or recessed ledges and pipes where birds are not nesting.
There are four key elements to properly installing the Coil system:
- Knowing the exact length and width of the ledge, and spacing the Coil appropriately
- Knowing what the ledge is made of
- Making the Coil stand up at each end
- Fastening a stainless steel Coil clip every 12 inches
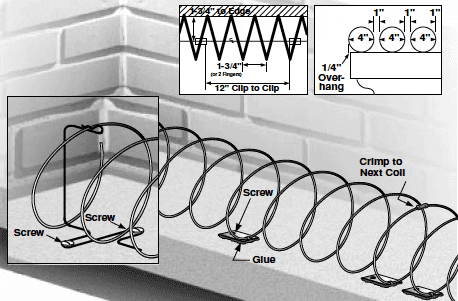
Once you know the length and width of the ledge, you can determine how many rows of Coil to install. As a rule, the Coil should overhang the outer edge of the ledge by at least 1/4″, and there should be no more than a 1″ gap between Coils when multiple rows are necessary to fully protect the ledge. Coils can be attached together for longer rows by using the crimp which is already installed at one end of each Coil. Coils are available in both 4″ and 5″ versions.

Bird-Coil Spacing
Each 25 foot Coil is delivered pulled together (like a spring) in a plastic bag. You must pull the Coil out 25 feet to achieve the proper spacing. The loops of the Coil must be exactly 1-3/4″ apart (about two fingers) to best deter landing birds. If the Coils are spaced any further, birds may be able to land in between the loops.
Fastening Bird-Coil Clips to Concrete with Screws
- Determine placement of Coil clips and end brackets. Remember the center of the 4″ Coil should be 1-3/4″ from the edge, and the center of the 5″ Coil should be 2-1/4″ from the edge. End posts should be at the extreme end of the ledge to deter birds from landing.
- Drill holes with a masonry bit, insert plastic anchors, and drive screws into the anchor. Use two screws on the end bracket (see diagram).
Fastening Bird-Coil Clips to Wood with Screws
- Determine placement of Coil clips and end brackets (as specified previously).
- Drive a self drilling screw through the clips and end bracket with a power drill.
Fastening Bird-Coil Clips to Any Surface with Glue
- Determine placement of Coil clips and end brackets (as specified previously).
- Make sure the ledge is clean, dry and free of any debris. The glue will not stick to peeling paint, rust, etc.
- Apply a small dab of Bird Barrier Bond* to the under side of the clip over the screw hole. Push the clip in place, forcing the bond up through the screw hole. Be sure the bond does not fill the clip end of the clip where the Coil will later be attached.
- The bonded clips must cure before the coil is installed. Wait at least four hours, although 24 hours is ideal.
* In general, one 3.75 oz. tube of bond will adhere approximately 100 coil clips and a 10.2 oz. cartridge will adhere about 275 clips.
Installing the Bird-Coil to the Clips
- Start at one end by clipping the Coil into the end post. The Coil should be pulled past the end of the bracket, and tucked under its end. The upper loop of the Coil should stay in the back notch of the bracket, so it can not spin out.
- Pull the Coil out, estimate the 2 finger gap, and clip the Coil into the first clip. It might help when installing the Coil to put it over your arm (like a bracelet), and play it out as you work down the ledge.
- Repeat as necessary to protect the whole ledge. Excess Coil can be cut using a pair of wire cutters.
Installation Time Estimate for Bird-Coil (assuming good access)
Twenty five foot Coil (1 row, glue or screw) = 15 minutes


